 |
Tools & Materials needed:
Standard Screwdriver
Pliers
Two Screws or Bolt Hooks for the Pulleys (Depending on the Ceiling)
Two Screws or Nails for the Wall Cleat
- Place steel rods in sleeves at top of bag.
- Uncoil chain & rope and attach the chain to the steel rod ends.
- Put a 6” hose clamp under the webbing at the bottom of the bag, place wire reinforced clear tubing inside the bag & tighten the hose clamp. Put the next hose clamp over the tubing, now insert valve and tighten the hose clamp.
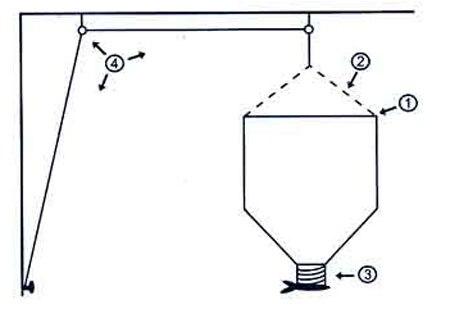
- As shown in sketch, attach the pulley to the ceiling and the cleat to the wall. Now thread the rope through the pulleys and hoist up the dispenser bag, tie off the rope at the cleat.
|
 Installation Instructions for Model #015 Dispenser Bag
Tools & Materials needed:
Standard Screwdriver
Two Screws or Bolt Hooks for the Pulleys (Depending on the Ceiling)
Two Screws or Nails for the Wall Cleat
Two 7/15” Wrenches or Pliers
- Place 38 1/2” steel rods in sleeves at top of bag.
- Spread 54 1/2” steel rods to form an X and attach the ends to the four corners of the rods using the bolt & nut provided at the end of the rod.
- Put the hose clamp thru the webbing sleeve at the bottom outlet – put the scissor valve in the outlet and tighten the hose clamp.
- Hang pulleys from the ceiling above where the bag is to hang and over to where the rope will drop to the tie off cleat. Attach the cleat to the wall.
- Tie off one end of the rope to the cleat. Thread the other end thru the pulleys and then tie it to the eye bolt at the center of the cross bars on the bag.
- Fill the bag and hoist it to the ceiling and then tie the rope to the cleat. You are ready to dispense the loose fill materials.


